Block Spam and Phishing from Spoofed Emails in Office 365

Spoofing block rule for Office 365

The more we rely on email, the more susceptible we are to spam and phishing attempts by cyber frauders. Recently, yet another company lost 3.8 million when they made a bank transfer requested by a spoofed email. How did it happen?

The attackers set up an email account that mirrored [Alutiiq CEO] Hambright’s email address and sent an email to Alutiiq’s controller that gave instructions about a “confidential transaction” by a person who called minutes later.

Pretending to be an attorney, the co-conspirator requested an “urgent” transfer of the $3.8 million “to an entity later revealed to be a fictitious third party company based in Hong Kong,” Hambright wrote. Hambright and the chief financial officer discovered the transfer two days later.

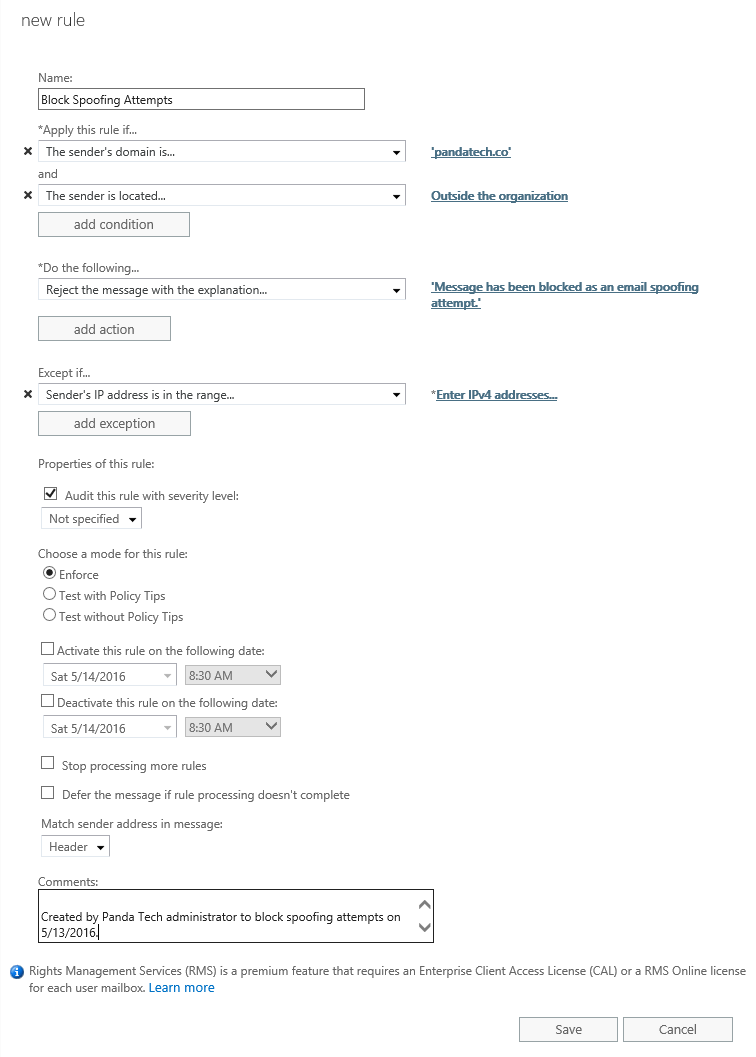
All companies small and large are susceptible to scams like this. Fortunately for Office 365 users, there is an easy way to effectively block spam and spoofing attempts by blocking senders from “Outside the organization”. Microsoft TechNet Blogger Caltaru Mihai also mentions this technique near the end of his Block Spoofing in Office 365 post and appropriately cautions “that this is a dangerous rule if not configured correctly, but it is very effective at blocking spoofing“.

Office 365 Exchange Admin Center

  1. Log into your Office 365 Exchange Admin Center
  2. Navigate to mailflow, then rules, and add a new rule
  3. Click “More Options…” near the bottom of the new window
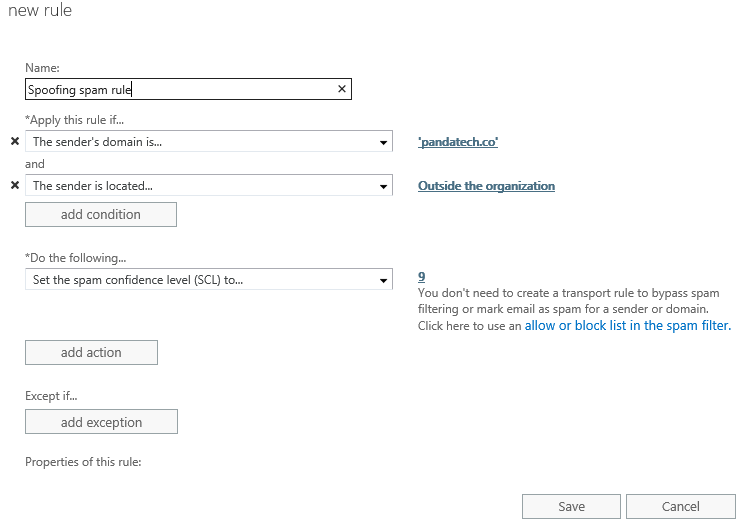
  4. Add two conditions:

       The sender’s domain is… yourdomain.com
    AND
       The sender is located… Outside the organization

  5. Add one action:

       Reject the message with the explanation… Message has been blocked as an email spoofing attempt.

    Or

       Modify the message properties… Set the spam confidence level (SCL) to… 9

  6. Add an exception(s)
    • This is not necessary, but it is usually a good idea to whitelist your company’s WAN IPs as well as any other legitimate services that may be sending emails on your company’s behalf. If you have SPF set up, then you can use the same IPs listed in the SPF TXT record
Spoofing block rule for Office 365
Spoofing spam rule for Office 365

Let me know if this rule works out for your organization, or if you find some new ways to improve it!

Configure a Custom Domain for Single Sign-On in Azure

Azure AD 1

Azure AD is a great new subscription based product from Microsoft, perfect for Apps and Cloud Backups, however adding a custom domain and configuring it for single sign-on with you local Active Directory can be tricky. After deleting my custom domain twice and all my synced users once, we discovered this to be the easiest way to setup single sign-on in Azure.

Prerequisites

  • Active Directory Federation Services must be installed and configured
  • A Global Administrator on Azure Active Directory
  • A Enterprise Administrator on your domain

Instructions

  1. Add the domain to Azure Active Directory. Check the “I plan to configure this domain for single sign-on with my local Active Directory.”
  2. Add a User. The user will be a “New user in your organization” and must have Global Administrator priveleges. We created “[email protected]
  3. Sign in with the new user and update the password.
  4. Get the code for verifying the custom domain by opening an elevated PowerShell session and running the following commands:
    $cred = Get-Credential
    Connect-MsolService -Credential $cred
    Get-MsolDomainVerificationDns -DomainName "pandatech.co" -Mode -DnsTxtRecord

    Enter the new user’s credentials in the prompt that opens after the first command. Then replace the last command with your own custom domain name. See the example output below:
    Azure DNS 2

  5. Create TXT record with the Alias or Hostname @ and the Address from the PowerShell results. Below is my record:
    Azure DNS
  6. Depending on your host and the internet, it may take a while before the DNS records update. Once they do you will need to run the following command:
    New-MsolFederatedDomain -DomainName "pandatech.co"

    If the DNS records have not updated yet, you will get an error. Once completed, the custom domain should appear as “Verified” in Azure AD. Successful PowerShell results look like this:
    Azure AD 3

  7. On a Domain Controller, install download and install Microsoft Azure Active Directory Connect.
  8. Run Azure AD Connect using the Express Settings, and sign in with the account you created in Step 3 on the first page. Sign in with an Enterprise Administrator on your domain in the second page. Check “Start the synchronization process as soon as the configuration completes”, and click Install.
    Azure AD Global AdministratorAzure Enterprise Administrator
  9. Installation should complete within a few minutes. The sync will automatically begin afterwards, and it may take some time depending on the size of your domain and your internet speed.
  10. Verify that accounts appear in Azure AD afterwards, and try signing into the Azure Portal with one of your local accounts.

Hopefully this helps you configure single sign-on in Azure with your local Active Directory. Post any questions in the comments. You may also find Microsoft’s Azure AD Directory Integration documentation helpful as well.

WSUS Configuration Fails: “ALTER DATABASE statement failed”

When you are installing or reinstalling Windows Server Update Services on a Windows Server 2012 machine, the WSUS post-deployment configuration tasks will sometimes fail.

Check the logs in C:\User\<username>\AppData\Temp\, and if the last line before the WSUS configuration failure states: “System.Data.SqlClient.SqlException (0x80131904): Changes to the state or options of database ‘SUSDB’ cannot be made at this time. The database is in single-user mode, and a user is currently connected to it. ALTER DATABASE statement failed” then you should prepare to remove the WSUS role, its associated features, and the database. Of course, you should backup your previous database, especially if this is a machine in production.

This is a snippet of the error that I kept getting in my logs:

2015-05-26 21:17:16  Configuring WID database...
2015-05-26 21:17:16  Configuring the database...
2015-05-26 21:17:19  Establishing DB connection...
2015-05-26 21:17:20  Checking to see if database exists...
2015-05-26 21:17:29  Database exists
2015-05-26 21:17:29  Switching database to single user mode...
2015-05-26 21:17:40  System.Data.SqlClient.SqlException (0x80131904): Changes to the state or options of database 'SUSDB' cannot be made at this time. The database is in single-user mode, and a user is currently connected to it.
ALTER DATABASE statement failed.
   at Microsoft.UpdateServices.DatabaseAccess.DBConnection.DrainObsoleteConnections(SqlException e)
   at Microsoft.UpdateServices.DatabaseAccess.DBConnection.ExecuteCommandNoResult()
   at Microsoft.UpdateServices.Administration.ConfigureDB.ConnectToDB()
   at Microsoft.UpdateServices.Administration.ConfigureDB.Configure()
   at Microsoft.UpdateServices.Administration.PostInstall.Run()
   at Microsoft.UpdateServices.Administration.PostInstall.Execute(String[] arguments)
ClientConnectionId:7c63a033-0472-4602-95ae-e1c80298bf92
Fatal Error: Changes to the state or options of database 'SUSDB' cannot be made at this time. The database is in single-user mode, and a user is currently connected to it.
ALTER DATABASE statement failed.

1. Remove Windows Server Update Services

You will need to remove Windows Server Update Services, WID Database, and WSUS Services from the Server Roles. You will also need to remove the Windows Internal Database from the Features.
WSUS Roles
WSUS Features

2. Delete the C:\Windows\WID folder

Unfortunately, removing the Windows Internal Database feature does not remove the actual database. You should back up this database if necessary, then delete the C:\Windows\WID folder
WSUS Folder

3. Re-install WSUS Role using a Local Admin account

Some have had success reinstalling it as a Domain Admin, however I have had mixed results. But I have never had an issue installing WSUS using a Local Admin account, so I recommend it to anyone who is still having issues installing WSUS and getting through the post-deployment configuration.

Let me know if this works for you or if you run into any other issues with your WSUS deployment.

Adding Multiple Users to Active Directory

ImportBulkUsers ps1

Adding Multiple Users to Active Directory can be done very simply by creating a CSV file, which administrators can easily edit using Excel, and running the PowerShell script below. (CSV template and script download at the bottom) Someone will still have to fill out every user’s information and ensure that the proper OU exists, but after that it is smooth sailing. This is just a starting point for administrators though; it is easy to specify more categories such as Department, Telephone, E-mail, etc. by adding columns to the CSV and lines to the PowerShell script.

The CSV

This CSV (download) is a starter template for adding multiple users to Active Directory. If you need to add more AD attributes, simply create a column, note the Ldap-Display-Name, and add the details for each user. Once this is complete, save it to a directory on a Domain Controller, and get ready to run the script below. We used the directory C:\ADtest in our example.

ImportBulkUsers CSV

The PowerShell script

The PowerShell script (download) has been written to with the CSV template above, but administrators will still need to make at least 1 edit to the script—in Line 4, administrators will need to edit “pandatech.co” to be there domain, such as “contoso.net”. Be sure to keep the quotation marks around the domain, otherwise you will run into syntax errors. The script also assumes that you saved the CSV file to C:\ADtest. Administrators can change this -Path to existing location in Line 2.

ImportBulkUsers ps1

The above shows the results from running it in PowerShell ISE. If you don’t want it to display successful results when adding multiple users to Active Directory, delete -PassThru from Line 17. If the user already exists, an error will be displayed, but the script will continue to process other users contained in the CSV. If you added more columns and attributes in the CSV, you’ll have to include the Ldap-Display-Name and column name between Lines 7-17.

Import-Module ActiveDirectory
Import-Csv -Path "C:\ADtest\importbulkusers.csv" | ForEach-Object {
    $SAM = $_.GivenName[0] + $_.Surname
    $UserPrincipalName = $SAM + "@pandatech.co"
    $Name = $_.GivenName + " " + $_.Surname
    New-ADUser `
        -UserPrincipalName $UserPrincipalName `
        -SamAccountName $SAM `
        -Name $Name `
        -DisplayName $Name `
        -GivenName $_.GivenName `
        -Surname $_.Surname `
        -Description $_.Description `
        -Path $_.Path `
        -AccountPassword (ConvertTo-SecureString $_.Password -AsPlainText -Force) `
        -Enabled $true `
        -PassThru
}

Download the CSV template
Download the PowerShell script

Enable Remote Disk Management on Windows Server 2012 R2 Core

Remote Disk Management

Microsoft recommends using Windows Server Core for many critical server roles, but that means you need to be a black belt with PowerShell. Even simple things, such as managing disks can be difficult. When you first connect, it is common to get errors such as “Disk Management could not start Virtual Disk Service (VDS) on…” or “The RPC server is unavailable.

This will help you configure Windows Firewall to enable remote disk management on Windows Server 2012 core installations.

Enable Firewall Exceptions on the Client and Server

You will need to enable the exceptions on both the machine you are trying to access (the Server) and the machine you are accessing from (the Client). You can do so with the following command in an elevated Command Prompt or PowerShell:

netsh advfirewall firewall set rule group="Remote Volume Management" new enable=yes

netsh advfirewall firewall set rule group="Remote Volume Management" new enable=yes
Note: My client machine updated 6 rules, but my server only updated 3 rules (as seen in the next screenshot.

On the Server, you can check if all the appropriate exceptions are enabled with the following PowerShell command:

Get-NetFirewallRule | Where { $_.DisplayGroup -Eq "Remote Volume Management" } | Format-Table

Make sure that all three items are enabled (True). If they are not, try running the netsh command again. Also, make sure that the VDS service is running on the Server. It is also a good idea to set the VDS service to start automatically.

Enable-NetFirewallRule -DisplayGroup "Remote Volume Management"

You can also try the commands recommended by Microsoft. They do the same thing as the netsh command above. If you want to see the individual exceptions that are updated, you can run it with the -verbose flag as I did in the screenshot.

Enable-NetFirewallRule -DisplayGroup "Remote Volume Management"

I hope these commands help you manage your Server Core installation.

Download A File Using PowerShell

messing with PowerShell (1)

Someday you may find yourself unable to download a file the normal way—clicking a link in a browser. You may be infected with a ZeroAccess rootkit or other malware, have Internet Explorer Enhanced Security Configuration turned on, or just have issues launching the browser. At that point, you should download a file using PowerShell. To download a file using PowerShell, users can run the following cmdlet:

(New-Object System.Net.WebClient).DownloadFile("http://domain/file", "C:\folder\file")

I’ve had to use this numerous times to download either anti-malware software or a different, non-Internet Explorer browser. However, on occasion, the PowerShell’s execution policy may be set to restricted, then users will have to run this cmdlet before they can download a file using PowerShell:

powershell Set-ExecutionPolicy Unrestricted

Download Music From Your iPod

iPod(s)

Since 2001, Apple iPods have been considered the best MP3 player year after year, including 2014. The hardware is intuitive to use, and it integrates seamlessly with iTunes, most of the time…

But, once in a while, your computer crashes; you lose your iTunes; and you can’t sync your iPod anymore without losing part or all of your music collection. This is how you salvage your collection with either a Mac or a Windows workstation. Just follow the steps below to download music from your iPod to your computer:

On a Mac

  1. Open iTunes and turn off automatic syncing
  2. Connect your iPod
  3. Enable disk use from iTunes:
    iTunes - Enable disk use
  4. Open Terminal, and run the following command, noting the name of your iPod:
    ls /Volumes
  5. Then run the following commands, replacing “IPOD_NAME” with your iPod name. Remember to escape any spaces in the name with \, or else you will get an error:
    rsync -arv /Volumes/IPOD_NAME/iPod_Control/Music ~/Desktop/Music/
    chflags -Rv nohidden ~/Desktop/iPod
  6. All your iPod music will be available in a folder called Music on your Desktop now

On Windows

  1. Open iTunes and turn off automatic syncing
  2. Connect your iPod
  3. Enable disk use from iTunes:
    iTunes - Enable disk use (PC)
  4. Under Tools > Folder Options…, click to the View tab and check Show hidden files, folders, and drives:
    Folder OptionsHidden Files
  5. Browse into the folder iPod_Control on your iPod. Move the Music folder to your Desktop.
  6. Once the transfer has finished, right-click the Music folder on your Desktop, and select Properties
  7. Unhide the folder and all folders and documents within the folder:
    Unhide Files
  8. All your iPod music will be available in a folder called Music on your Desktop now. Afterwards, you may choose to hide other files again as in Step 4.

Reset the Windows Administrator Password

Windows 7 logon screen in a museum exhibition

Every IT technician has run into a situation where they no longer have Local Admin access to a workstation. When it happens, you’ll rarely have a Windows CD nearby to reset the password. That’s where the Offline Windows Password and Registry Editor comes to save the day.

A good technician should never show up on-site without this package in their toolbox. Just download the package, copy it to a USB, and boot from the USB. A copy of the tool is hosted on our site. The original instructions are below:

  1. Get the machine to boot from the CD or USB drive.
  2. Load drivers (usually automatic, but possible to run manual select)
  3. Disk select, tell which disk contains the Windows system. Optionally you will have to load drivers.
  4. PATH select, where on the disk is the system? (now usually automatic)
  5. File select, which parts of registry to load, based on what you want to do.
  6. Password reset or other registry edit.
  7. Write back to disk (you will be asked)

Users should first review the documentation and FAQ before using this tool, but this is the easiest tool we’ve found in our experience. It is also available on CD, for anyone who may not have the option of booting from a USB.