Troubleshooting Splunk Enterprise Performance

Good Data Imbalance 24h


If you manage an on-prem Splunk Enterprise environment, you will often have to check to make sure that everything is performing optimally. The primary limitations to your environments search capacity will be the IOPS of disks in your Indexers (Search Peers) and CPU/Memory of your Search Heads. As long as your meeting the Splunk requirements for IOPS, then the Indexer side should be sufficient. In most cases, if you are still have search issues related to the Indexers, add more Indexers, i.e., scale out rather than up in most cases, but most importantly, meet the IOPS requirements. As for the Search Head, this can benefit from both scaling up, out, and adjusting your Splunk configurations depending on what’s available to you. When Splunk is under-performing, it can become a good idea to review the following:

  1. Review Data (Im)balance
  2. Assess Disk Performance
  3. Identify Slow Indexers
  4. Assess CPU/Memory Performance
  5. Guesstimate Scheduled Search Capacity

1. Review Data (Im)balance

Run the below search over the last 24 hours to check for data imbalance. Below are sample screenshots of both good and bad data imbalance scenarios. The search shows the number of events being indexed by each of your Splunk indexers. To keep things visually clear, this environment comprises 4 non-clustered indexers.

To begin remediating, I would try to identify any problematic indices first, and then taking steps to narrow down if there are just a few forwarders or sources that are responsible. At that point, it should be much easier to identify whether there is a misconfiguration, most likely in the outputs.conf or props.conf file.

| tstats count where index=* by span=1s _time splunk_server
| timechart span=1s useother=false sum(count) by splunk_server

Good Data Imbalance

When data is balanced, you should see events spread relatively evenly and few spikes. This means data is breaking evenly and being evenly distributed to your indexers.

Good Data Imbalance 24h
Good Data Imbalance (24 hours)
Good Data Imbalance 1m
Good Data Imbalance (Zoomed In 1 minute)

Bad Data Imbalance

With bad data imbalance, you can see spikes of events going to a single indexer or two at a time. In the below example, there is a lower line around 150, which shows good looking data distribution. However, there is a line around 500, which clearly shows that one log source is not breaking events properly. In this example, it is a single poorly configured forwarder. This is not the worst scenario, but not ideal. The more spikes and inconsistencies, the worse the data imbalance problem may be in your environment.

Even if there is no single source of the issue, a natural imbalance can occur over time. If so, then you should still customize the outputs.conf settings for your environment. Once your incoming data looks more balanced, then you can rebalance the existing data if you are using an indexer cluster.

Bad Data Imbalance 24h
Bad Data Imbalance (24 hours)
Bad Data Imbalance 1m
Bad Data Imbalance (Zoomed In 1 minute)

2. Assess Disk Performance

Each indexer should be able to search roughly 125,000 events/sec. The more events/second is better. Run the following search in Fast Mode (Last 4 hours is usually sufficient). Since we are using Fast Mode, this is almost a direct test of pure disk performance in searches.

index=_internal 
| stats count by splunk_server

Use the job inspector to see the number of events and how many seconds it took. If your results are below the expected numbers, then you should scroll down and see if one or more indexers are the root cause of the slow performance.
Splunk IOPS Test

    \[\frac{78,685,956 \text{ events}}{107,117 \text{ seconds}} / 4 \text{ indexers} = \textbf{183,644 \text{events per second per indexer}}\]

3. Identify Slow Indexers

If the issue is believed to be related to a specific (search peer), the below stanza can be used to troubleshoot. Add the below lines to the $SPLUNK_HOME/etc/system/local/limits.conf file. This does not require a splunk restart to take effect. Perform a search again, and use the job inspector to see detailed times on how long each action takes on an indexer. Remember to set it to false again after troubleshooting has been completed.

[search_metrics]
debug_metrics = true

4. Assess CPU/Memory Performance

The expected performance for this search is roughly 5,000 events/sec. The more events/second is better. Run the following search in Smart Mode (Last 4 hours is usually sufficient, but use the same time frame as you used for your IOPS test):

index=_internal

Use the job inspector to see the number of events and how many seconds it took. If your results are below the expected numbers, then you should assess whether your search head has enough resources based on the number of users and scheduled searches. Further below are steps to guesstimate your scheduled search capacity.
Splunk CPU Memory Test

    \[\frac{78,198,966 \text{ events}}{1,968,556 \text{ seconds}} / 4 \text{ indexers} = \textbf{10,058 \text{events per second per indexer}}\]

5. Guesstimate Scheduled Search Capacity

If your search issue may be related to CPU or Memory, it is most likely an issue on the Search Head. You can start by reviewing the number of users in your environment in addition to the number of scheduled searches configured. Scheduled search settings can be found in the $SPLUNK_HOME/etc/system/local/limits.conf file. See the below default settings and how search capacity can be roughly calculated based on the numbers.

[search]
base_max_searches = 6
max_rt_search_multiplier = 1
max_searches_per_cpu = 1

Assuming the recommended 16 CPU core configuration and the above custom settings, you can see that the number of schedules searches is pretty limited. This is why there are often recommendations for much more CPU and RAM for Enterprise Security deployments.

    \[(16 \text{ CPU cores } \times 1 \text{ max searches per cpu}) + 6 \text{ base max searches} = \textbf{22 \text{total searches}}\]


    \[\lfloor 22 \text{ total searches} \times \frac{1}{2} \rfloor = \textbf{11 \text{scheduled searches}}\]


    \[11 \text{ scheduled searches} \times 1 \text{ max rt search multiplier} = \textbf{11 \text{real time scheduled searches}}\]


    \[\lfloor 11 \text{ scheduled searches} \times \frac{1}{2} \rfloor = \textbf{5 \text{data model accelerations or summaries}}\]

Set Up Docker Credential Store on VMware Photon

Photon OS

If you’re using ESXi hypervisors and Docker, you’re probably using VIC or running it on an Ubuntu VM. But recently we tried VMware’s new “Minimal Linux Container Host”, Photon OS.

With Photon, you can install packages using tdnf. To keep it minimalist, we avoided adding any additional repositories, but this made it surprisingly difficult to set up the credential store. We decided to set up pass to protect our login. Otherwise, credentials will appear in cleartext in the ~/.docker/config.json file.

Install Packages from tdnf

To make this easier you’ll want all of the below packages.

  • wget
  • tar
  • make
  • gnupg
  • tree
root@photon-machine [ ~ ]# tdnf -y install wget tar make gnupg tree

Login to Docker

Log in to Docker at least once if you have not already done so. This will automatically create the ~/.docker/config.json file for you.

root@photon-machine [ ~ ]# docker login
Login with your Docker ID to push and pull images from 

Docker Hub

. If you don't have a Docker ID, head over to https://hub.docker.com to create one.
Username: pandatech0
Password: 
WARNING! Your password will be stored unencrypted in /root/.docker/config.json.
Configure a credential helper to remove this warning. See
https://docs.docker.com/engine/reference/commandline/login/#credentials-store

Login Succeeded
root@photon-machine [ ~ ]# docker logout
Removing login credentials for https://index.docker.io/v1/

Manually Install pass

None of the built-in repositories in Photon come with pass. Be sure to check the official site in case there is a newer version than what is in the instructions below.

root@photon-machine [ ~ ]# wget https://git.zx2c4.com/password-store/snapshot/password-store-1.7.3.tar.xz
root@photon-machine [ ~ ]# tar -xf password-store-1.7.3.tar.xz 
root@photon-machine [ ~ ]# cd password-store-1.7.3/
root@photon-machine [ ~ ]# make install

Manually Install docker-credential-pass

Once pass is installed, you can download and install docker-credential-pass from Docker’s GitHub.

root@photon-machine [ ~ ]# wget https://github.com/docker/docker-credential-helpers/releases/download/v0.6.0/docker-credential-pass-v0.6.0-amd64.tar.gz
root@photon-machine [ ~ ]# tar -xf docker-credential-pass-v0.6.0-amd64.tar.gz
root@photon-machine [ ~ ]# chmod +x docker-credential-pass 
root@photon-machine [ ~ ]# mv docker-credential-pass /usr/local/bin/

Update the Docker Config File

root@photon-machine [ ~ ]# vi ~/.docker/config.json

This file should have been automatically created the first time you ran docker login. Add line 8 as seen below:

{
    "auths": {
        "https://index.docker.io/v1/": {}
    },
    "HttpHeaders": {
        "User-Agent": "Docker-Client/18.06.2 (linux)"
    },
    "credsStore": "pass"
}

Generate Keys for the Store

Before you can properly use pass, you’ll need to generate a key for encrypting all your passwords. For simplicity we used the simple command. You may want to consider using gpg --full-generate-key to view all of the possible key creation options.

root@photon-machine [ ~ ]# gpg --generate-key

You’ll be prompted for email address, and then you’ll be asked to create and confirm a password for the store. Below is the sample output. This may take a while to generate the key. I usually set it to run before bed.

gpg (GnuPG) 2.2.10; Copyright (C) 2018 Free Software Foundation, Inc.
This is free software: you are free to change and redistribute it.
There is NO WARRANTY, to the extent permitted by law.

Note: Use "gpg --full-generate-key" for a full featured key generation dialog.

GnuPG needs to construct a user ID to identify your key.

Real name: 
Email address: [email protected]
You selected this USER-ID:
    "[email protected]"

Change (N)ame, (E)mail, or (O)kay/(Q)uit? o
We need to generate a lot of random bytes. It is a good idea to perform
some other action (type on the keyboard, move the mouse, utilize the
disks) during the prime generation; this gives the random number
generator a better chance to gain enough entropy.

Initialize Pass

First, verify that a new, valid key was created with the below:

root@photon-machine [ ~ ]# gpg --list-keys
gpg: checking the trustdb
gpg: marginals needed: 3  completes needed: 1  trust model: pgp
gpg: depth: 0  valid:   1  signed:   0  trust: 0-, 0q, 0n, 0m, 0f, 1u
gpg: next trustdb check due at 2020-02-27
/root/.gnupg/pubring.kbx
------------------------
pub   rsa2048 2018-02-28 [SC] [expires: 2020-02-27]
      FFFFFFFFFFFFFFF0000000000000000000000000
uid           [ultimate] [email protected]
sub   rsa2048 2018-02-28 [E] [expires: 2020-02-27]

After verification, initialize pass using the email address you created a key with. You’ll be prompted to create and confirm a password for the store.

root@photon-machine [ ~ ]# pass init [email protected]
Password store initialized for [email protected]

Initialize docker-credential-pass

Using pass show you should see the docker-credential-helpers. If not, try running docker login and docker logout again. You may receive an error that “pass store is uninitialized”. Run the below to initialize the docker-credential-helpers. You may get a prompt for your store’s password again (the password you created in the previous step).

root@photon-machine [ ~ ]# pass show
Password Store
└── docker-credential-helpers
    └── docker-pass-initialized-check

root@photon-machine [ ~ ]# pass show docker-credential-helpers/docker-pass-initialized-check 
pass is initialized

root@photon-machine [ ~ ]# pass show
Password Store
└── docker-credential-helpers
    └── sHR0cHM6Ly0pdNRLeC5kb2NrZXIvyW8vdjFW
        └── pandatech0

Conclusion

You should be all set now. But now logging in will sometimes be a two-step process because the store will time out after some time:

root@photon-machine [ ~ ]# pass show docker-credential-helpers/docker-pass-initialized-check 
pass is initialized

root@photon-machine [ ~ ]# docker login
Authenticating with existing credentials...
Login Succeeded

After docker login, you can check cat ~/.docker/config.json, and you should not see any of your credentials in cleartext. Now you are finally ready to safely push and pull containers through your Docker Hub account.

Increase NextCloud 13 VM Storage

NextCloud

NextCloud is one of the most popular ways for users to take control of their data again. Users can use NextCloud to manage their Contacts, Calendars, Files, and a number of other types of data with the available Apps. NextCloud is a fork of the original ownCloud, but advocates more of an emphasis on the community’s needs.

The pre-configured NextCloud 13 VM uses the ZFS file system to manage storage, and it makes increasing storage incredibly easy. Previous versions of the NextCloud VM required many steps of expanding, partitioning, extending, and resizing to increase storage. To increase NextCloud 13 VM storage is much simpler:

  1. Add new hard disk
  2. Scan for new hard disk
  3. Add new disk to the ZFS pool “ncdata”
  4. Verify ZFS pool “ncdata” size

Below are screenshots and a walkthrough, including sample output of the commands, to increase NextCloud 13 VM storage running on VMWare ESXi. You will need to either have console or SSH access to your NextCloud host as well as sudo access.

First, run df -Th to verify the “ncdata” size; in my environment it is 39G, as seen on line 8.

Filesystem                     Type      Size  Used Avail Use% Mounted on
udev                           devtmpfs  1.9G     0  1.9G   0% /dev
tmpfs                          tmpfs     393M  1.5M  391M   1% /run
/dev/mapper/nextcloud--vg-root ext4       39G  3.0G   34G   9% /
tmpfs                          tmpfs     2.0G  8.0K  2.0G   1% /dev/shm
tmpfs                          tmpfs     5.0M     0  5.0M   0% /run/lock
tmpfs                          tmpfs     2.0G     0  2.0G   0% /sys/fs/cgroup
ncdata                         zfs        39G   24M   39G   1% /mnt/ncdata
tmpfs                          tmpfs     393M     0  393M   0% /run/user/1000

1. Add new hard disk

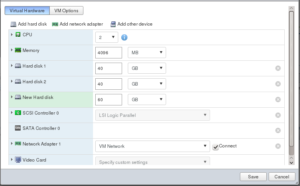
Add a new disk to the VM. Because NextCloud 13 VM uses ZFS pools, it is easier to increase your storage by adding new drives rather than expanding or extending existing drives. We are adding a 60 GB hard drive in our example.
ESXi New Hard Disk

2. Scan for new hard disk

After adding the drive, either reboot or scan for the new disk with the below command, replacing “host0” with the appropriate host number.

echo "- - -" > /sys/class/scsi_host/host0/scan

If you have many hosts like me, you can use the below bash script to just scan through them all.

#! /bin/bash
for host in "/sys/class/scsi_host"/*
do
    echo "- - -" > $host/scan
done
exit 0

After scanning or rebooting, run fdisk -l to view all the partitions, including the new one. In my environment, you will see that the 60G partition appears as “sdc” beginning on line 36 below. Note the partition for the next step.

Disk /dev/sda: 40 GiB, 42949672960 bytes, 83886080 sectors
Units: sectors of 1 * 512 = 512 bytes
Sector size (logical/physical): 512 bytes / 512 bytes
I/O size (minimum/optimal): 512 bytes / 512 bytes
Disklabel type: dos
Disk identifier: 0x01a86cc8

Device     Boot Start      End  Sectors Size Id Type
/dev/sda1  *     2048 83884031 83881984  40G 8e Linux LVM


Disk /dev/sdb: 40 GiB, 42949672960 bytes, 83886080 sectors
Units: sectors of 1 * 512 = 512 bytes
Sector size (logical/physical): 512 bytes / 512 bytes
I/O size (minimum/optimal): 512 bytes / 512 bytes
Disklabel type: gpt
Disk identifier: 840790A0-AC2C-E045-97C5-E7F3CFD52BE4

Device        Start      End  Sectors Size Type
/dev/sdb1      2048 83867647 83865600  40G Solaris /usr & Apple ZFS
/dev/sdb9  83867648 83884031    16384   8M Solaris reserved 1


Disk /dev/mapper/nextcloud--vg-root: 39 GiB, 41875931136 bytes, 81788928 sectors
Units: sectors of 1 * 512 = 512 bytes
Sector size (logical/physical): 512 bytes / 512 bytes
I/O size (minimum/optimal): 512 bytes / 512 bytes


Disk /dev/mapper/nextcloud--vg-swap_1: 976 MiB, 1023410176 bytes, 1998848 sectors
Units: sectors of 1 * 512 = 512 bytes
Sector size (logical/physical): 512 bytes / 512 bytes
I/O size (minimum/optimal): 512 bytes / 512 bytes


Disk /dev/sdc: 60 GiB, 64424509440 bytes, 125829120 sectors
Units: sectors of 1 * 512 = 512 bytes
Sector size (logical/physical): 512 bytes / 512 bytes
I/O size (minimum/optimal): 512 bytes / 512 bytes

3. Add new disk to the ZFS pool “ncdata”

Next, verify the current “ncdata” size using zpool list. You can also verify the partitions in the pool first using zpool status ncdata seen further below.

NAME     SIZE  ALLOC   FREE  EXPANDSZ   FRAG    CAP  DEDUP  HEALTH  ALTROOT
ncdata  39.8G  23.7M  39.7G         -     0%     0%  1.00x  ONLINE  -

When you are ready, use the below command to add the new partition to the ZFS Pool. In our example, we are adding the partition “sdc” to the ZFS Pool “ncdata”.

zpool add ncdata /dev/sdc

4. Verify ZFS pool “ncdata” size

Run zpool list again afterwards to verify the increased size.

NAME     SIZE  ALLOC   FREE  EXPANDSZ   FRAG    CAP  DEDUP  HEALTH  ALTROOT
ncdata  99.2G  24.1M  99.2G         -     0%     0%  1.00x  ONLINE  -

As suggested above, you can use zpool status ncdata to verify the new partition has been added to the pool as well.

  pool: ncdata
 state: ONLINE
  scan: none requested
config:

	NAME        STATE     READ WRITE CKSUM
	ncdata      ONLINE       0     0     0
	  sdb       ONLINE       0     0     0
	  sdc       ONLINE       0     0     0

errors: No known data errors

Google Play Music Manager on a Virtual Machine

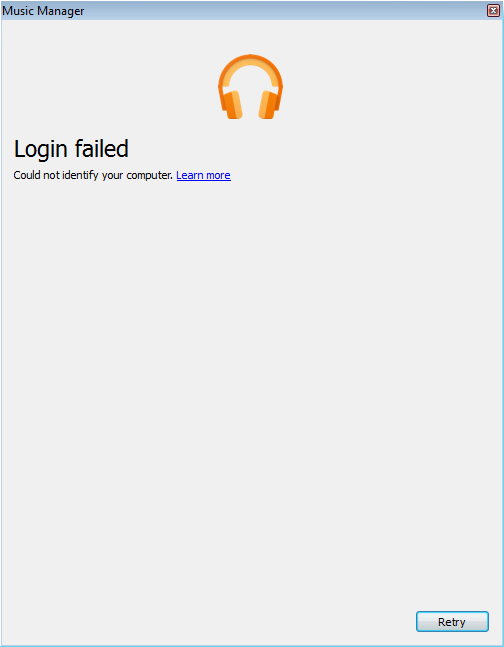
Google Play Music Manager Login Failed

The first time you install Google Play Music Manager on a virtual machine you will probably receive the error, “Login failed. Could not identify your computer.” You’ll definitely experience this on any VMware ESXi virtual machines. Google currently doesn’t support virtual machines. Therefore, Music Manager on a virtual machine in Hyper-V or XenServer will likely encounter this problem as well.

Google Play Music Manager Login Failed

Installing Google Play Music Manager on a virtual machine is a great idea if you have a home server for streaming and storing media. Google Play Music is still one of the best free options for keeping a copy of your library in the cloud. But you will need to install Google Play’s Music Manager software if you want to automatically keep songs in sync (up to 50,000 songs). Just be aware that it is a great cloud option for streaming, but not archiving or backup, particularly if you are an audiophile. Google’s system will convert loseless FLAC and ALAC down to 320kbps MP3 files.

Manually Assign a MAC Address

The standard VMware OUI MAC addresses will NOT work, i.e., the following three-byte prefixes will not work: 00:0C:29 and 00:50:56. We have had no issues using a randomly generated MAC address. There is the small chance that it will overlap with another device on your network, but that is very unlikely, and you can easily use another MAC from the generated list.

  • Generate a random MAC address for the virtual machine
  • Manually assign the address
  • Start/restart the virtual machine and you should be able to login to Google Play Music Manager now

Windows 2016 Shares Not Working via Hostname

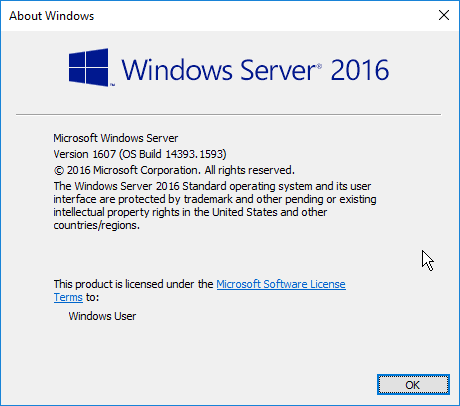
Windows Server 2016 Version 1607

Some versions of Windows 2016 have an authentication issue which causes shares to not work via hostname. Shares continue to work via IP, but a registry change must be made for the share to work via hostname. You should first verify that you are definitely not experiencing a DNS issue or a cached credential issue; most of the time, it is a DNS issue.

At least one other post reports similar issues in Windows 10. When this issue arises, a dialog box prompting for credentials will pop-up, but any network credentials will return “Access is denied” and ask you to enter credentials again. The only credentials that will work are local accounts on the server.

Conditions for the Issue

  • Windows Server 2016 Version 1607
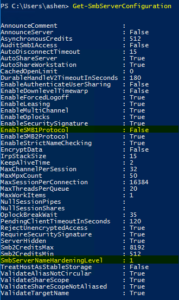
  • Enable-SMB1Protocol:  False
  • SmbServerNameHardeningLevel:  1 or 2

You can check the second two items by running the below command from PowerShell.

Get-SmbServerConfiguration

Get-SmbServerConfiguration

The Solution for Shares not Working via Hostname

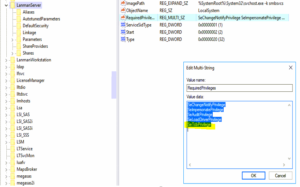
We fixed this issue with one registry change. Edit the RequiredPrivileges entry in the below path and append SeTcbPrivelege to the end of the list. Additional details about the SeTcbPrivilege parameter are available from Microsoft. Microsoft has claimed that this solution is only a “workaround”, and there should be a hotfix for it in the future.

HKEY_LOCAL_MACHINE\SYSTEM\CurrentControlSet\Services\LanmanServer
LanmanServer RequiredPrivileges

The Cause

The shares do not work via hostname because of a Kerberos authentication issue. IP shares still work because it uses NTLM authentication, whereas FQDN hostname shares use Kerberos. The latest hotfixes have fixed this in most versions of Windows 10 and 2016. However, in Version 1607, it has not been addressed yet by the 2017-08 Update (KB4035631) or Security Update (KB4034658).

We discovered this by poring over many traces and logs while trying to access the shares. A packet analysis shows “STATUS_ACCESS_DENIED” replies to the Session Setup Requests from the Client. An SRV trace reveals an “SPN (cifs/SERVER.DOMAIN.com) is invalid” error.

Cisco Meraki DHCP Reservations and VLANs

Cisco Meraki VLAN 1

DHCP is easy to configure on a Cisco Meraki in smaller environments without a dedicated server. Meraki DHCP reservations and settings can be tricky though if you switch between enabling/disabling VLANs.

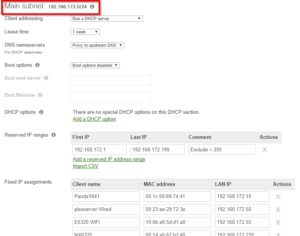
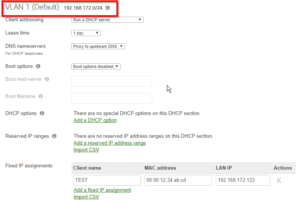
Unless you are sure you will never use VLANs, you should Enable VLANs before creating any DHCP reservations and settings. Although the subnet and MX IP will be the same under both configurations, none of the previously added reservations will carry over; they must be re-added.

Addressing and VLANs Enabled or Disabled

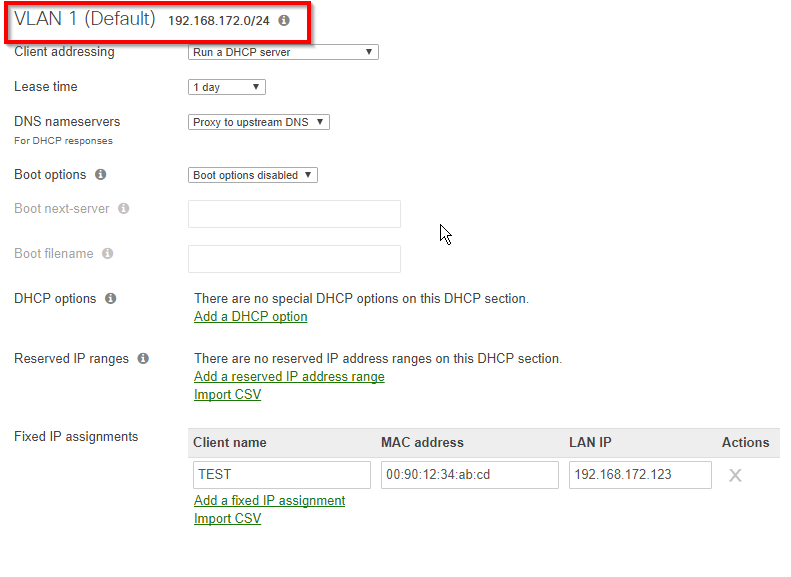
The DHCP reservations do not carry over because the network with VLANs Disabled is technically the “Main Subnet”, whereas with VLANs Enabled, the network is “VLAN 1 (Default)”, as seen in the pictures below.  Since the settings do not carry over, we recommend Enabling VLANs even if you only use a single subnet.

Meraki DHCP Reservations with VLANs Disabled
Meraki VLANs Main Subnet

Meraki DHCP Reservations with VLANs Enabled
Cisco Meraki VLAN 1

DNS Debug Log Error with Splunk

DNS Debug Logging

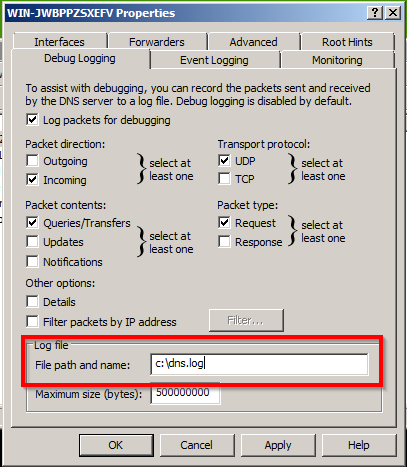
System administrators should turn on advanced debug logging from the DNS Manager console to get the most out of Windows DNS Events. Unfortunately, Microsoft did not design the debug log file for 3rd party logging and monitoring software. Administrators may encounter a DNS debug log error because of this.

A handful of Splunk and McAfee SIEM users have complained that Windows DNS logging stops after a while. Some suggest using a Scheduled Task which works because the log file is recreated every time Restart-Service DNS  is run. This will resolve the DNS debug log error until the file reaches its maximum size again, but it will also restart the DNS Server service quite frequently.

Signs of the DNS Debug Log Error

  • Splunk (or other monitoring software) stops logging DNS events
  • An Event ID 3152 Error shows up around the same time logging stops
  • The debug log file no longer exists in the set file path
  • The file path for the log file is not on the same volume as the Windows OS (C:)

The Solution

Set the DNS debug log file path to a location on the same volume as the Windows OS (C); it’s that simple.

DNS Debug Logging

The Cause

The system backs up and deletes the log file when it reaches its maximum size, then an empty log file of the same filename is created in the same location. However, the log file is recreated in a slightly different way if it is not on the same volume as the OS. This difference is what causes the DNS debug log error that Splunk users may experience. Credit goes to adm at NXLog for finding the solution.

Managing Office 365 via Active Directory

How Azure AD Connect works

The company has moved from an on-premise Exchange Server to Office 365. You have set up AD Connect to sync all your data and passwords. You have decommissioned and uninstalled all local instances of Exchange Server. Suddenly you discover that you must manage Office 365 via Active Directory, and it seems impossible to because many settings must be changed in the Active Directory Users and Computers Attribute Editor.

Your options for management are essentially the following:

  1. Disable AD Connect – Your data in AD and Azure AD will no longer be synced, but you can easily manage everything from https://portal.office.com/adminportal/home#/homepage.
  2. Install Exchange Server locally – Your data will be in sync. You can set up Mail-Enabled Users to manage users with mailboxes, and groups and contacts will be managed the same way as before via the Exchange Management Console.
  3. Manage mailboxes through Active Directory Users and Computers – Your data will be in sync, and you will have the turn on “Advanced Features” to access the Attribute Editor.

This is a reference table with examples choose Option 3, and manage Office 365 via Active Directory.

TypeFunctionAD AttributeExample
UserHide User from Address BookmsExchHideFromAddressListsTRUE
UserSet alias emailproxyAddressessmtp:[email protected]
UserSet primary emailproxyAddressesSMTP:[email protected]
UserSet Exchange AliasmailNicknameinfo
GroupPermitted SendersauthOrigCN=First Last,OU=IT,OU=Panda Tech,DC=pandatech,DC=co

Frequently used Office 365 settings that are difficult to find in the AD Attribute Editor will continue to be added to the table in the future.

Connect using Windows RSAT with a Non-Domain Joined Machine

When deploying your first Windows Server Core installation, you may find yourself having difficulty managing the server using Windows RSAT. This may be because there is no DOMAIN and one or both the server and workstation are part of a WORKGROUP. Below is the method I use to ensure initial access from a workstation using Windows RSAT Tools.

The demo connects a Windows 10 Pro workstation to manage a Microsoft Hyper-V Server 2012 R2 installation. Remember that you’ll at least need to be running Windows 8.1 to properly remotely manage a Windows 2012 server.

Prerequisites

winrm quickconfig
  • Firewall rules have been configured. If you are just testing, you can easily turn of the firewall by running the following:
netsh advfirewall set allprofiles state off

Instructions

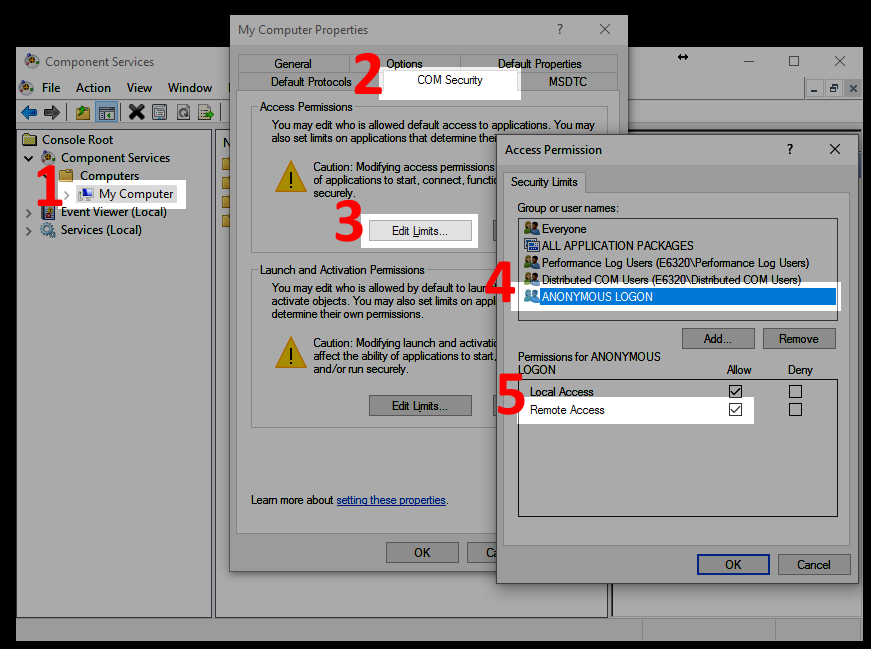
You’ll need to start by opening the Component Services MMC, or Run… dcomcnfg. Expand Component Services, then Computers.

  1. Right-click My Computer and select Properties
  2. Select the COM Security tab
  3. Under the Access Permissions section, click Edit Limits…
  4. Highlight ANONYMOUS LOGIN
  5. Check the box next to Remote Access; by default it should be unchecked
RSAT dcomcnfg settings

Next, you’ll want to run PowerShell as an Administrator. The name of my lab server is “2012CORE” and the user is “2012CORE\Administrator“. You’ll want to replace these with your own values.

The first line will add credentials for your server to Windows Credential Manager. The second line adds your server’s DNS hostname to the TrustedHosts list. You cannot use an IP for this. If your workstation cannot reach the server via hostname, you may need to update the hosts file manually. Finally, the third line is used to verify that your server now appears in the TrustedHosts list.

cmdkey /add:2012CORE /user:2012CORE\Administrator /pass
Set-Item "WSMan:\localhost\Client\TrustedHosts" 2012CORE
Get-Item -Path WSMan:\localhost\Client\TrustedHosts | fl Name, Value
RSAT PowerShell

Hopefully, this will help you remotely manage that core server outside of your domain using Windows RSAT.

Fix Windows 10 Apps Not Working

Windows 10 Apps not working

A handful of users have encountered an issue with some or all of their Windows 10 Apps not working after an update. For myself, I noticed this happen when I tried to open my Calculator and Store apps. According to the Programount blog, this often happens if you have your display scale above 100% or multiple languages installed. In my case, I have multiple languages.

If you’re lucky, the Windows apps troubleshooter will fix the problem. If not, there are a number of suggested solutions by Microsoft, but for many like myself, nothing seems to work. Some suggestions like performing a clean install or creating a new user profile and transferring all your data circumvent the issue with Windows 10 Apps not working, but they don’t actually “fix” the problem. However, some have also stated that creating a new user only temporarily resolves the issue.

To fix my Windows 10 Apps not working, I had to try (and fail) reinstalling them using the PowerShell commands, then go digging in the Event Viewer for the specific cause of the issue.  Below are the steps I followed to repair my Store App.

  1. Open a PowerShell window; be sure to Run as Administrator…
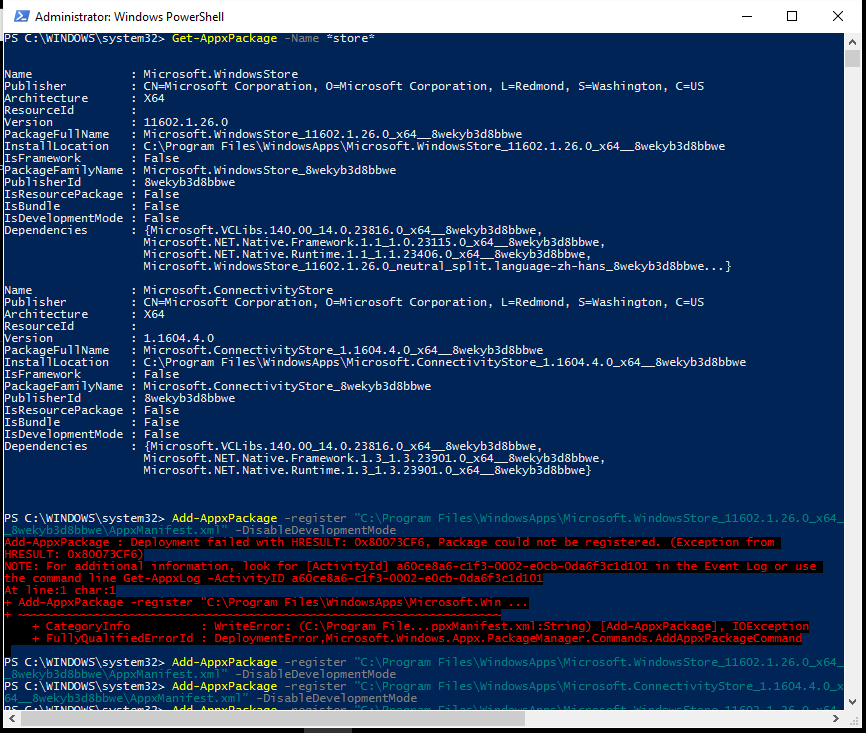
  2. Search for the App by Name using the following command:
Get-AppxPackage -Name <em>store</em>
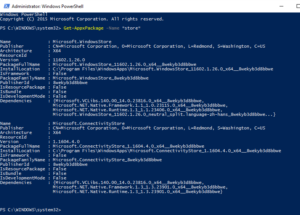
  1. Note the PackageFullName. In this example it is Microsoft.WindowsStore_11602.1.26.0_x64__8wekyb3d8bbwe.
Get-AppxPackage
  1. Try to reinstall the package, and you’ll most likely receive an error:
Add-AppxPackage -register "C:\Program Files\WindowsApps\Microsoft.WindowsStore_11602.1.26.0_x64_ _8wekyb3d8bbwe\AppxManifest.xml" -DisableDevelopmentMode
Add-AppxPackage
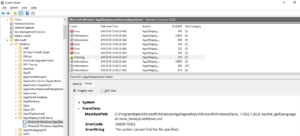
  1. Now we’ll have to open up Event Viewer and navigate to the below log and look for the most recent Warning message, and click on the Details tab to identify what is causing the issue. For me the issue was that a file under the ManifestPath was not found, because it did not exist–the file C:\ProgramData\Microsoft\Windows\AppRepository\Microsoft.WindowsStore_11602.1.26.0_neutral_split.language-zh-hans_8wekyb3d8bbwe.xml.
Application and Services Logs
└── Microsoft
    └── Windows
        └── AppXDeployment-Server
            └── Microsoft-Windows-AppXDeplomentServer/Operational
Event Viewer MainfestPath
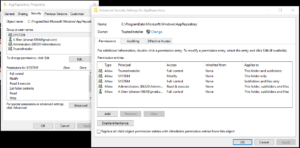
  1. Navigate to the folder causing the issue. If you do not have permissions to AppRepository, you will have to temporarily make yourself an Owner.
AppRepository Owner
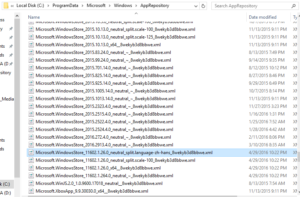
  1. Once you are, you will probably see that the file in the ManifestPath earlier does not exist. Find a similar file and copy and paste it into the folder. I used the Microsoft.WindowsStore_11602.1.26.0_neutral_split.scale-100_8wekyb3d8bbwe.xml file.
  2. Rename it to match the missing file from earlier.
Missing ManifestPath File
  1. Edit the ResourceId in the XML file to match the missing item. For me, it was split.language-zh-hans.
step11
  1. Revert the AppRepository folder’s Owner to NT SERVICE\TrustedInstaller.
  2. Run the PowerShell command again, and it should run without an error
Add-AppxPackage -register "C:\Program Files\WindowsApps\Microsoft.WindowsStore_11602.1.26.0_x64_ _8wekyb3d8bbwe\AppxManifest.xml" -DisableDevelopmentMode
Add-AppxPacakge success
  1. Try opening the App again, and it should work now

Because the Windows 10 Apps may not be working for a number of reasons, this may not solve all the Windows 10 Apps not working issues people are facing, but hopefully it can help some individuals. Regardless, let me know if you have any improvements or insights.