Connect using Windows RSAT with a Non-Domain Joined Machine

When deploying your first Windows Server Core installation, you may find yourself having difficulty managing the server using Windows RSAT. This may be because there is no DOMAIN and one or both the server and workstation are part of a WORKGROUP. Below is the method I use to ensure initial access from a workstation using Windows RSAT Tools.

The demo connects a Windows 10 Pro workstation to manage a Microsoft Hyper-V Server 2012 R2 installation. Remember that you’ll at least need to be running Windows 8.1 to properly remotely manage a Windows 2012 server.

Prerequisites

winrm quickconfig
  • Firewall rules have been configured. If you are just testing, you can easily turn of the firewall by running the following:
netsh advfirewall set allprofiles state off

Instructions

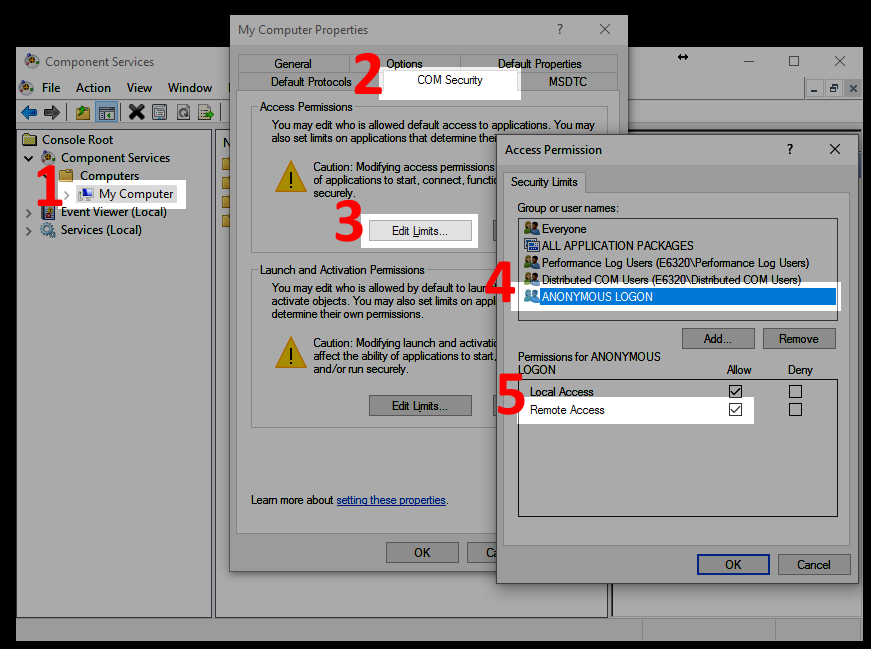
You’ll need to start by opening the Component Services MMC, or Run… dcomcnfg. Expand Component Services, then Computers.

  1. Right-click My Computer and select Properties
  2. Select the COM Security tab
  3. Under the Access Permissions section, click Edit Limits…
  4. Highlight ANONYMOUS LOGIN
  5. Check the box next to Remote Access; by default it should be unchecked
RSAT dcomcnfg settings

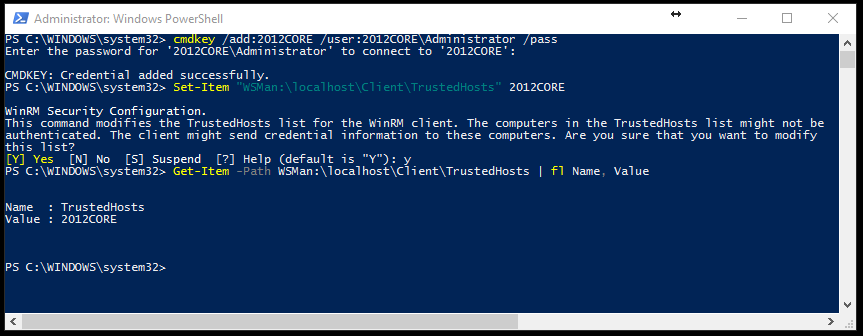
Next, you’ll want to run PowerShell as an Administrator. The name of my lab server is “2012CORE” and the user is “2012CORE\Administrator“. You’ll want to replace these with your own values.

The first line will add credentials for your server to Windows Credential Manager. The second line adds your server’s DNS hostname to the TrustedHosts list. You cannot use an IP for this. If your workstation cannot reach the server via hostname, you may need to update the hosts file manually. Finally, the third line is used to verify that your server now appears in the TrustedHosts list.

cmdkey /add:2012CORE /user:2012CORE\Administrator /pass
Set-Item "WSMan:\localhost\Client\TrustedHosts" 2012CORE
Get-Item -Path WSMan:\localhost\Client\TrustedHosts | fl Name, Value
RSAT PowerShell

Hopefully, this will help you remotely manage that core server outside of your domain using Windows RSAT.

Fix Windows 10 Apps Not Working

Windows 10 Apps not working

A handful of users have encountered an issue with some or all of their Windows 10 Apps not working after an update. For myself, I noticed this happen when I tried to open my Calculator and Store apps. According to the Programount blog, this often happens if you have your display scale above 100% or multiple languages installed. In my case, I have multiple languages.

If you’re lucky, the Windows apps troubleshooter will fix the problem. If not, there are a number of suggested solutions by Microsoft, but for many like myself, nothing seems to work. Some suggestions like performing a clean install or creating a new user profile and transferring all your data circumvent the issue with Windows 10 Apps not working, but they don’t actually “fix” the problem. However, some have also stated that creating a new user only temporarily resolves the issue.

To fix my Windows 10 Apps not working, I had to try (and fail) reinstalling them using the PowerShell commands, then go digging in the Event Viewer for the specific cause of the issue.  Below are the steps I followed to repair my Store App.

  1. Open a PowerShell window; be sure to Run as Administrator…
  2. Search for the App by Name using the following command:
Get-AppxPackage -Name <em>store</em>
  1. Note the PackageFullName. In this example it is Microsoft.WindowsStore_11602.1.26.0_x64__8wekyb3d8bbwe.
Get-AppxPackage
  1. Try to reinstall the package, and you’ll most likely receive an error:
Add-AppxPackage -register "C:\Program Files\WindowsApps\Microsoft.WindowsStore_11602.1.26.0_x64_ _8wekyb3d8bbwe\AppxManifest.xml" -DisableDevelopmentMode
Add-AppxPackage
  1. Now we’ll have to open up Event Viewer and navigate to the below log and look for the most recent Warning message, and click on the Details tab to identify what is causing the issue. For me the issue was that a file under the ManifestPath was not found, because it did not exist–the file C:\ProgramData\Microsoft\Windows\AppRepository\Microsoft.WindowsStore_11602.1.26.0_neutral_split.language-zh-hans_8wekyb3d8bbwe.xml.
Application and Services Logs
└── Microsoft
    └── Windows
        └── AppXDeployment-Server
            └── Microsoft-Windows-AppXDeplomentServer/Operational
Event Viewer MainfestPath
  1. Navigate to the folder causing the issue. If you do not have permissions to AppRepository, you will have to temporarily make yourself an Owner.
AppRepository Owner
  1. Once you are, you will probably see that the file in the ManifestPath earlier does not exist. Find a similar file and copy and paste it into the folder. I used the Microsoft.WindowsStore_11602.1.26.0_neutral_split.scale-100_8wekyb3d8bbwe.xml file.
  2. Rename it to match the missing file from earlier.
Missing ManifestPath File
  1. Edit the ResourceId in the XML file to match the missing item. For me, it was split.language-zh-hans.
step11
  1. Revert the AppRepository folder’s Owner to NT SERVICE\TrustedInstaller.
  2. Run the PowerShell command again, and it should run without an error
Add-AppxPackage -register "C:\Program Files\WindowsApps\Microsoft.WindowsStore_11602.1.26.0_x64_ _8wekyb3d8bbwe\AppxManifest.xml" -DisableDevelopmentMode
Add-AppxPacakge success
  1. Try opening the App again, and it should work now

Because the Windows 10 Apps may not be working for a number of reasons, this may not solve all the Windows 10 Apps not working issues people are facing, but hopefully it can help some individuals. Regardless, let me know if you have any improvements or insights.

Adding Multiple Users to Active Directory

ImportBulkUsers ps1

Adding Multiple Users to Active Directory can be done very simply by creating a CSV file, which administrators can easily edit using Excel, and running the PowerShell script below. (CSV template and script download at the bottom) Someone will still have to fill out every user’s information and ensure that the proper OU exists, but after that it is smooth sailing. This is just a starting point for administrators though; it is easy to specify more categories such as Department, Telephone, E-mail, etc. by adding columns to the CSV and lines to the PowerShell script.

The CSV

This CSV (download) is a starter template for adding multiple users to Active Directory. If you need to add more AD attributes, simply create a column, note the Ldap-Display-Name, and add the details for each user. Once this is complete, save it to a directory on a Domain Controller, and get ready to run the script below. We used the directory C:\ADtest in our example.

ImportBulkUsers CSV

The PowerShell script

The PowerShell script (download) has been written to with the CSV template above, but administrators will still need to make at least 1 edit to the script—in Line 4, administrators will need to edit “pandatech.co” to be there domain, such as “contoso.net”. Be sure to keep the quotation marks around the domain, otherwise you will run into syntax errors. The script also assumes that you saved the CSV file to C:\ADtest. Administrators can change this -Path to existing location in Line 2.

ImportBulkUsers ps1

The above shows the results from running it in PowerShell ISE. If you don’t want it to display successful results when adding multiple users to Active Directory, delete -PassThru from Line 17. If the user already exists, an error will be displayed, but the script will continue to process other users contained in the CSV. If you added more columns and attributes in the CSV, you’ll have to include the Ldap-Display-Name and column name between Lines 7-17.

Import-Module ActiveDirectory
Import-Csv -Path "C:\ADtest\importbulkusers.csv" | ForEach-Object {
    $SAM = $_.GivenName[0] + $_.Surname
    $UserPrincipalName = $SAM + "@pandatech.co"
    $Name = $_.GivenName + " " + $_.Surname
    New-ADUser `
        -UserPrincipalName $UserPrincipalName `
        -SamAccountName $SAM `
        -Name $Name `
        -DisplayName $Name `
        -GivenName $_.GivenName `
        -Surname $_.Surname `
        -Description $_.Description `
        -Path $_.Path `
        -AccountPassword (ConvertTo-SecureString $_.Password -AsPlainText -Force) `
        -Enabled $true `
        -PassThru
}

Download the CSV template
Download the PowerShell script

Download A File Using PowerShell

messing with PowerShell (1)

Someday you may find yourself unable to download a file the normal way—clicking a link in a browser. You may be infected with a ZeroAccess rootkit or other malware, have Internet Explorer Enhanced Security Configuration turned on, or just have issues launching the browser. At that point, you should download a file using PowerShell. To download a file using PowerShell, users can run the following cmdlet:

(New-Object System.Net.WebClient).DownloadFile("http://domain/file", "C:\folder\file")

I’ve had to use this numerous times to download either anti-malware software or a different, non-Internet Explorer browser. However, on occasion, the PowerShell’s execution policy may be set to restricted, then users will have to run this cmdlet before they can download a file using PowerShell:

powershell Set-ExecutionPolicy Unrestricted