DNS Debug Log Error with Splunk

DNS Debug Logging

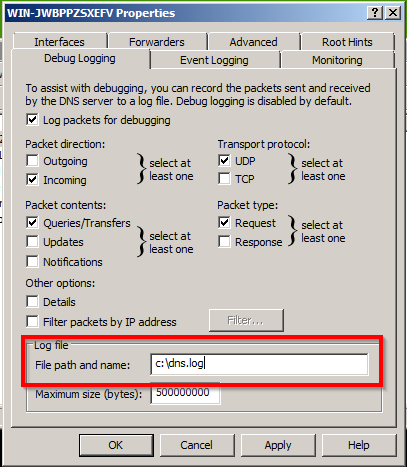
System administrators should turn on advanced debug logging from the DNS Manager console to get the most out of Windows DNS Events. Unfortunately, Microsoft did not design the debug log file for 3rd party logging and monitoring software. Administrators may encounter a DNS debug log error because of this.

A handful of Splunk and McAfee SIEM users have complained that Windows DNS logging stops after a while. Some suggest using a Scheduled Task which works because the log file is recreated every time Restart-Service DNS  is run. This will resolve the DNS debug log error until the file reaches its maximum size again, but it will also restart the DNS Server service quite frequently.

Signs of the DNS Debug Log Error

  • Splunk (or other monitoring software) stops logging DNS events
  • An Event ID 3152 Error shows up around the same time logging stops
  • The debug log file no longer exists in the set file path
  • The file path for the log file is not on the same volume as the Windows OS (C:)

The Solution

Set the DNS debug log file path to a location on the same volume as the Windows OS (C); it’s that simple.

DNS Debug Logging

The Cause

The system backs up and deletes the log file when it reaches its maximum size, then an empty log file of the same filename is created in the same location. However, the log file is recreated in a slightly different way if it is not on the same volume as the OS. This difference is what causes the DNS debug log error that Splunk users may experience. Credit goes to adm at NXLog for finding the solution.

Block Spam and Phishing from Spoofed Emails in Office 365

Spoofing block rule for Office 365

The more we rely on email, the more susceptible we are to spam and phishing attempts by cyber frauders. Recently, yet another company lost 3.8 million when they made a bank transfer requested by a spoofed email. How did it happen?

The attackers set up an email account that mirrored [Alutiiq CEO] Hambright’s email address and sent an email to Alutiiq’s controller that gave instructions about a “confidential transaction” by a person who called minutes later.

Pretending to be an attorney, the co-conspirator requested an “urgent” transfer of the $3.8 million “to an entity later revealed to be a fictitious third party company based in Hong Kong,” Hambright wrote. Hambright and the chief financial officer discovered the transfer two days later.

All companies small and large are susceptible to scams like this. Fortunately for Office 365 users, there is an easy way to effectively block spam and spoofing attempts by blocking senders from “Outside the organization”. Microsoft TechNet Blogger Caltaru Mihai also mentions this technique near the end of his Block Spoofing in Office 365 post and appropriately cautions “that this is a dangerous rule if not configured correctly, but it is very effective at blocking spoofing“.

Office 365 Exchange Admin Center

  1. Log into your Office 365 Exchange Admin Center
  2. Navigate to mailflow, then rules, and add a new rule
  3. Click “More Options…” near the bottom of the new window
  4. Add two conditions:

       The sender’s domain is… yourdomain.com
    AND
       The sender is located… Outside the organization

  5. Add one action:

       Reject the message with the explanation… Message has been blocked as an email spoofing attempt.

    Or

       Modify the message properties… Set the spam confidence level (SCL) to… 9

  6. Add an exception(s)
    • This is not necessary, but it is usually a good idea to whitelist your company’s WAN IPs as well as any other legitimate services that may be sending emails on your company’s behalf. If you have SPF set up, then you can use the same IPs listed in the SPF TXT record
Spoofing block rule for Office 365
Spoofing spam rule for Office 365

Let me know if this rule works out for your organization, or if you find some new ways to improve it!