NextCloud is one of the most popular ways for users to take control of their data again. Users can use NextCloud to manage their Contacts, Calendars, Files, and a number of other types of data with the available Apps. NextCloud is a fork of the original ownCloud, but advocates more of an emphasis on the community’s needs.
The pre-configured NextCloud 13 VM uses the ZFS file system to manage storage, and it makes increasing storage incredibly easy. Previous versions of the NextCloud VM required many steps of expanding, partitioning, extending, and resizing to increase storage. To increase NextCloud 13 VM storage is much simpler:
- Add new hard disk
- Scan for new hard disk
- Add new disk to the ZFS pool “ncdata”
- Verify ZFS pool “ncdata” size
Below are screenshots and a walkthrough, including sample output of the commands, to increase NextCloud 13 VM storage running on VMWare ESXi. You will need to either have console or SSH access to your NextCloud host as well as sudo access.
First, run df -Th to verify the “ncdata” size; in my environment it is 39G, as seen on line 8.
Filesystem                     Type      Size  Used Avail Use% Mounted on
udev                           devtmpfs  1.9G     0  1.9G   0% /dev
tmpfs                          tmpfs     393M  1.5M  391M   1% /run
/dev/mapper/nextcloud--vg-root ext4       39G  3.0G   34G   9% /
tmpfs                          tmpfs     2.0G  8.0K  2.0G   1% /dev/shm
tmpfs                          tmpfs     5.0M     0  5.0M   0% /run/lock
tmpfs                          tmpfs     2.0G     0  2.0G   0% /sys/fs/cgroup
ncdata                         zfs        39G   24M   39G   1% /mnt/ncdata
tmpfs                          tmpfs     393M     0  393M   0% /run/user/1000
1. Add new hard disk
Add a new disk to the VM. Because NextCloud 13 VM uses ZFS pools, it is easier to increase your storage by adding new drives rather than expanding or extending existing drives. We are adding a 60 GB hard drive in our example.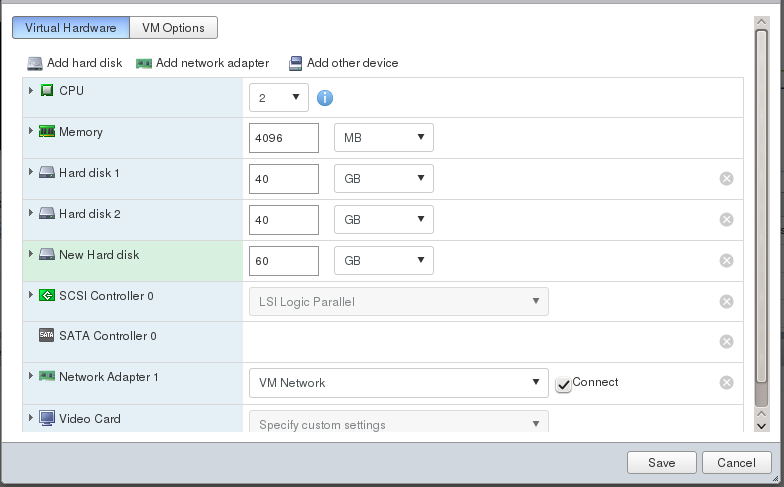
2. Scan for new hard disk
After adding the drive, either reboot or scan for the new disk with the below command, replacing “host0” with the appropriate host number.
echo "- - -" > /sys/class/scsi_host/host0/scan
If you have many hosts like me, you can use the below bash script to just scan through them all.
#! /bin/bash
for host in "/sys/class/scsi_host"/*
do
    echo "- - -" > $host/scan
done
exit 0
After scanning or rebooting, run fdisk -l to view all the partitions, including the new one. In my environment, you will see that the 60G partition appears as “sdc” beginning on line 36 below. Note the partition for the next step.
Disk /dev/sda: 40 GiB, 42949672960 bytes, 83886080 sectors
Units: sectors of 1 * 512 = 512 bytes
Sector size (logical/physical): 512 bytes / 512 bytes
I/O size (minimum/optimal): 512 bytes / 512 bytes
Disklabel type: dos
Disk identifier: 0x01a86cc8

Device     Boot Start      End  Sectors Size Id Type
/dev/sda1  *     2048 83884031 83881984  40G 8e Linux LVM


Disk /dev/sdb: 40 GiB, 42949672960 bytes, 83886080 sectors
Units: sectors of 1 * 512 = 512 bytes
Sector size (logical/physical): 512 bytes / 512 bytes
I/O size (minimum/optimal): 512 bytes / 512 bytes
Disklabel type: gpt
Disk identifier: 840790A0-AC2C-E045-97C5-E7F3CFD52BE4

Device        Start      End  Sectors Size Type
/dev/sdb1      2048 83867647 83865600  40G Solaris /usr & Apple ZFS
/dev/sdb9  83867648 83884031    16384   8M Solaris reserved 1


Disk /dev/mapper/nextcloud--vg-root: 39 GiB, 41875931136 bytes, 81788928 sectors
Units: sectors of 1 * 512 = 512 bytes
Sector size (logical/physical): 512 bytes / 512 bytes
I/O size (minimum/optimal): 512 bytes / 512 bytes


Disk /dev/mapper/nextcloud--vg-swap_1: 976 MiB, 1023410176 bytes, 1998848 sectors
Units: sectors of 1 * 512 = 512 bytes
Sector size (logical/physical): 512 bytes / 512 bytes
I/O size (minimum/optimal): 512 bytes / 512 bytes


Disk /dev/sdc: 60 GiB, 64424509440 bytes, 125829120 sectors
Units: sectors of 1 * 512 = 512 bytes
Sector size (logical/physical): 512 bytes / 512 bytes
I/O size (minimum/optimal): 512 bytes / 512 bytes
3. Add new disk to the ZFS pool “ncdata”
Next, verify the current “ncdata” size using zpool list. You can also verify the partitions in the pool first using zpool status ncdata seen further below.
NAME     SIZE  ALLOC   FREE  EXPANDSZ   FRAG    CAP  DEDUP  HEALTH  ALTROOT
ncdata  39.8G  23.7M  39.7G         -     0%     0%  1.00x  ONLINE  -
When you are ready, use the below command to add the new partition to the ZFS Pool. In our example, we are adding the partition “sdc” to the ZFS Pool “ncdata”.
zpool add ncdata /dev/sdc
4. Verify ZFS pool “ncdata” size
Run zpool list again afterwards to verify the increased size.
NAME     SIZE  ALLOC   FREE  EXPANDSZ   FRAG    CAP  DEDUP  HEALTH  ALTROOT
ncdata  99.2G  24.1M  99.2G         -     0%     0%  1.00x  ONLINE  -
As suggested above, you can use zpool status ncdata to verify the new partition has been added to the pool as well.
  pool: ncdata
 state: ONLINE
  scan: none requested
config:

	NAME        STATE     READ WRITE CKSUM
	ncdata      ONLINE       0     0     0
	  sdb       ONLINE       0     0     0
	  sdc       ONLINE       0     0     0

errors: No known data errors