Download A File Using PowerShell

messing with PowerShell (1)

Someday you may find yourself unable to download a file the normal way—clicking a link in a browser. You may be infected with a ZeroAccess rootkit or other malware, have Internet Explorer Enhanced Security Configuration turned on, or just have issues launching the browser. At that point, you should download a file using PowerShell. To download a file using PowerShell, users can run the following cmdlet:

(New-Object System.Net.WebClient).DownloadFile("http://domain/file", "C:\folder\file")

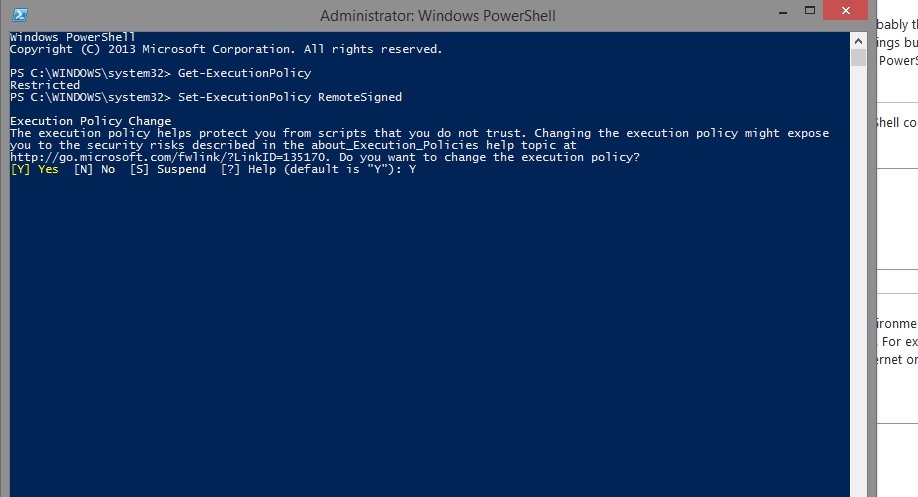
I’ve had to use this numerous times to download either anti-malware software or a different, non-Internet Explorer browser. However, on occasion, the PowerShell’s execution policy may be set to restricted, then users will have to run this cmdlet before they can download a file using PowerShell:

powershell Set-ExecutionPolicy Unrestricted

Download Music From Your iPod

iPod(s)

Since 2001, Apple iPods have been considered the best MP3 player year after year, including 2014. The hardware is intuitive to use, and it integrates seamlessly with iTunes, most of the time…

But, once in a while, your computer crashes; you lose your iTunes; and you can’t sync your iPod anymore without losing part or all of your music collection. This is how you salvage your collection with either a Mac or a Windows workstation. Just follow the steps below to download music from your iPod to your computer:

On a Mac

  1. Open iTunes and turn off automatic syncing
  2. Connect your iPod
  3. Enable disk use from iTunes:
    iTunes - Enable disk use
  4. Open Terminal, and run the following command, noting the name of your iPod:
    ls /Volumes
  5. Then run the following commands, replacing “IPOD_NAME” with your iPod name. Remember to escape any spaces in the name with \, or else you will get an error:
    rsync -arv /Volumes/IPOD_NAME/iPod_Control/Music ~/Desktop/Music/
    chflags -Rv nohidden ~/Desktop/iPod
  6. All your iPod music will be available in a folder called Music on your Desktop now

On Windows

  1. Open iTunes and turn off automatic syncing
  2. Connect your iPod
  3. Enable disk use from iTunes:
    iTunes - Enable disk use (PC)
  4. Under Tools > Folder Options…, click to the View tab and check Show hidden files, folders, and drives:
    Folder OptionsHidden Files
  5. Browse into the folder iPod_Control on your iPod. Move the Music folder to your Desktop.
  6. Once the transfer has finished, right-click the Music folder on your Desktop, and select Properties
  7. Unhide the folder and all folders and documents within the folder:
    Unhide Files
  8. All your iPod music will be available in a folder called Music on your Desktop now. Afterwards, you may choose to hide other files again as in Step 4.

Reset the Windows Administrator Password

Windows 7 logon screen in a museum exhibition

Every IT technician has run into a situation where they no longer have Local Admin access to a workstation. When it happens, you’ll rarely have a Windows CD nearby to reset the password. That’s where the Offline Windows Password and Registry Editor comes to save the day.

A good technician should never show up on-site without this package in their toolbox. Just download the package, copy it to a USB, and boot from the USB. A copy of the tool is hosted on our site. The original instructions are below:

  1. Get the machine to boot from the CD or USB drive.
  2. Load drivers (usually automatic, but possible to run manual select)
  3. Disk select, tell which disk contains the Windows system. Optionally you will have to load drivers.
  4. PATH select, where on the disk is the system? (now usually automatic)
  5. File select, which parts of registry to load, based on what you want to do.
  6. Password reset or other registry edit.
  7. Write back to disk (you will be asked)

Users should first review the documentation and FAQ before using this tool, but this is the easiest tool we’ve found in our experience. It is also available on CD, for anyone who may not have the option of booting from a USB.